
Are you ready to unleash your child’s creativity and connect them with nature at the same time? Acorn art projects for kids are an excellent way to do just that! Not only do they make for wonderful conversation starters, but they also provide a fun and interactive way to learn about the natural world. From creating bird feeders to crafting 3D sculptures, the possibilities are endless when it comes to making masterpieces with acorns. In this article, we’ll be diving into the ultimate guide to acorn art projects for kids, covering everything from simple yet stunning designs to more complex and intricate creations. Get ready to discover a world of creativity and fun as we explore the best ways to make nature-inspired art using acorns!
Introduction to Acorn Art
Welcome to the world of acorn art, where tiny treasures become big masterpieces! In this next section, we’ll explore the basics of creating beautiful and creative projects using these natural wonders.
What are Acorns?
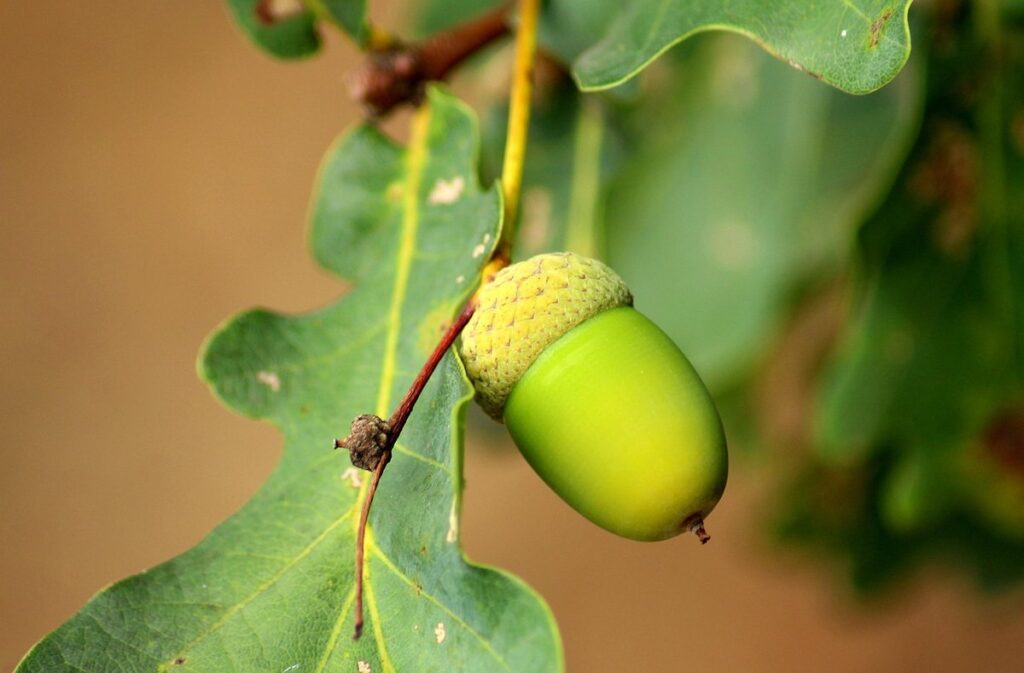
Acorns are the nuts produced by oak trees, and they’re an integral part of nature’s cycle. Found on the ground beneath the majestic branches of these trees, acorns play a vital role in sustaining various forms of wildlife. Their unique shape and texture set them apart from other types of nuts.
Notice how acorns have a distinct cap that covers about one-third of their surface. This cap is actually the cupule, which protects the nut within as it grows. When an acorn falls from its tree, this cap usually comes off, revealing the smooth, rounded surface underneath. The texture of an acorn can vary greatly depending on the specific species of oak that produced it. Some acorns are large and plump, while others are smaller and more slender.
The unique shape of an acorn makes it a popular choice for craft projects, especially among children. When gathered from nature, cleaned, and dried properly, acorns become a versatile material that can be used in a variety of creative ways. With their natural beauty and significance in the ecosystem, acorns offer endless opportunities for artistic expression and exploration.
Why Use Acorns in Art?
When working with kids on art projects, it’s essential to explore natural materials that not only inspire creativity but also foster an appreciation for nature. Acorns are a fantastic choice for several reasons. For one, they promote environmental awareness and encourage children to appreciate the beauty of their surroundings.
By incorporating acorns into art projects, kids develop fine motor skills as they carefully arrange, glue, or paint them onto a canvas or paper. This hands-on approach also enhances their dexterity and coordination. You can try a simple activity like having your child create an acorn collage using different textures and colors.
Moreover, working with natural materials like acorns allows children to express themselves creatively without the constraints of traditional art supplies. It’s a wonderful way to encourage imagination and experimentation. To get started, gather a collection of acorns in various shapes, sizes, and colors. Then, set up an art space where kids can explore and create freely – remember to provide plenty of glue, paint, or other materials for them to express their creativity.
This approach also lays the groundwork for future eco-friendly practices, such as reducing waste and reusing natural resources. By introducing acorns in this context, you’re not only sparking artistic expression but also teaching valuable life skills that extend beyond the art room.
Preparing Acorns for Art Projects
Now that you have collected and cleaned your acorns, it’s time to prepare them for use in art projects by following these easy steps. Get ready to transform them into beautiful creations!
Collecting and Cleaning Acorns
When it comes to using acorns for art projects with kids, collecting and preparing them is an essential step. To start, let’s talk about where to find acorns safely. You can collect them from the ground in a park or forest, but make sure to avoid areas that may have been sprayed with pesticides or are prone to pollution.
To ensure you’re collecting clean acorns, look for ones that are plump and free of mold. Avoid acorns that have visible signs of damage or decay. When handling acorns, wash your hands thoroughly before and after touching them to prevent the spread of any potential contaminants.
After collection, it’s time to clean the acorns properly. Soak them in a bowl of water for about an hour to loosen any dirt. Then, gently scrub them with a soft-bristled brush or a toothbrush under running water to remove any remaining debris. This will help prevent mold growth and keep your acorns looking their best.
Finally, lay the cleaned acorns out on paper towels or a clean cloth to air dry. You can also use a low-temperature oven (150°F – 200°F) for 1-2 hours to speed up the drying process. Make sure they’re completely dry before using them in your art projects to prevent any potential damage or mess.
Painting and Decorating Acorns
Painting and decorating acorns is an excellent way to add some extra personality to your art project. You can use various techniques to create unique and eye-catching designs. One fun option is to add glitter to your acorn. Simply dip the tip of a small brush into glue, then sprinkle some glitter onto the acorn before adding another layer of glue on top. This will help the glitter stick in place.
Another great way to decorate acorns is by using stickers. You can find stickers with various designs and patterns that kids love. Apply them to the acorn using a bit of water or glue, depending on the sticker’s instructions. This method is perfect for younger children who may have trouble painting small areas.
You can also try natural dyes like coffee or turmeric to create earthy tones. Simply boil some water, add a teaspoon of the chosen dye, and let it cool before brushing it onto the acorn. Be sure to test the color on a separate acorn first to ensure the desired effect.
Fun Acorn Crafts for Kids
Get ready for some nutty fun as we dive into our favorite acorn crafts that are perfect for kids to get creative and make something truly special! From painting to collaging, we’ve got it all.
Acorn Bird Feeders
To create an acorn bird feeder, you’ll need some basic materials. Start by gathering 10-12 acorns and a few sturdy twigs or branches for the feeder’s framework. You’ll also require some string or wire for hanging, peanut butter or nut butter, seeds, and maybe some decorative items like beads or paint.
Begin by spreading a layer of peanut butter on each acorn, making sure to cover it evenly. This will serve as the “glue” that holds the bird feeder together. Next, press the acorns onto the twigs or branches in a pattern that resembles a small bird feeder. Make sure they’re securely attached.
To add some extra appeal for birds, thread seeds like sunflower or pumpkin seeds through the acorn holes before pressing them onto the framework. Hang your finished bird feeder in a nearby tree, and watch as the birds discover their new snack spot. As you work on this project with kids, encourage them to observe the different types of birds that visit and note which ones prefer the acorns over other food sources.
Acorn Collage Art
Creating an acorn collage is a fantastic way to encourage kids to experiment with different textures and colors. Start by gathering various materials such as colored paper, construction paper, magazine cutouts, scissors, glue, and of course, plenty of acorns! Begin by sorting the materials into categories – rough, smooth, shiny, and matte.
Now, it’s time for the fun part. Let your child arrange the materials on a piece of cardboard or paper in any way they like. Encourage them to experiment with layering, overlapping, and combining different textures to create unique visual effects. For instance, placing an acorn on top of a shiny magazine cutout can add depth and interest.
As your child works, remind them that it’s okay to make mistakes – they’re actually an essential part of the creative process! Encourage them to try new things, turn their failures into successes, and celebrate their individuality. With patience and imagination, the result will be a one-of-a-kind acorn collage that showcases their unique style.
Remember, the key to creating something truly special is to let go of perfectionism and have fun with the process. So, don’t worry if it gets messy – just enjoy the journey!
3D Acorn Sculptures
Get ready to take acorn art to a whole new level as we explore how to create adorable and intricate 3D sculptures that bring your garden’s treasures to life.
Using Modeling Clay or Play-Dough
Creating 3D acorn sculptures using modeling clay or play-dough is a fantastic way to encourage kids’ creativity and imagination. This fun project is perfect for little hands to get involved and explore the world of art.
To start, you’ll need some modeling clay or play-dough in shades of brown, beige, and tan to resemble the natural colors of acorns. You can also add some texture by mixing in some glitter or sand to create a realistic look.
Begin by shaping the clay into small ovals or spheres, which will form the body of your acorn. Encourage kids to experiment with different shapes and sizes to make each acorn unique. To add detail, use a toothpick or skewer to create ridges on the surface, mimicking the texture of an actual acorn.
For added texture, try using a rolling pin or even a fork to create patterns on the clay. You can also attach some small beads or eyes to create a more realistic look. Experiment with different shapes and designs to see what kind of 3D acorns you can come up with!
Paper Mache Acorns
Creating paper mache acorns is a fun and creative activity that kids will love. To get started, you’ll need a few simple materials: balloons, strips of newspaper or paper strips, water, and white glue. Inflate the balloon to the desired size for your acorn, then cut strips of paper about 1-2 inches wide.
Begin applying layers of paper strips to the balloon, overlapping each strip slightly as you go. Make sure to apply a thin layer of glue to the back of each strip before attaching it to the balloon. Repeat this process until you have 3-4 layers of paper on your balloon. Allow each layer to dry completely before adding the next one.
As you work, encourage kids to experiment with different patterns and textures by adding additional details like leaves or twigs. Be patient – creating a good paper mache acorn takes time! It can take up to 24 hours for the layers to dry completely.
Acorn-themed Snacks and Treats
Get creative with acorns beyond art, and indulge your kids’ sweet tooth with these adorable and easy-to-make acorn-inspired snacks and treats. Think nutty delights!
Edible Acorn Decorations
Creating edible acorn decorations is a fun and tasty way to add a personal touch to your acorn-themed snacks and treats. With just a few simple ingredients like chocolate, nuts, or cookie dough, you can create adorable decorations that are almost too cute to eat.
Start by melting some chocolate in the microwave or over a double boiler, then dip the top of an acorn-shaped cookie cutter into the melted chocolate. Immediately sprinkle with chopped nuts or shredded coconut before the chocolate hardens. This creates a beautiful textured and patterned design.
You can also use store-bought cookie dough to create acorn shapes by rolling out the dough into small balls and flattening them slightly into disk shapes. Use a toothpick or small knife to create texture on top, mimicking the ridges of an actual acorn. Let the decorations set in the fridge before using them as toppings for cupcakes, cookies, or even ice cream sundaes.
These edible decorations are perfect for acorn-themed parties or as a fun addition to any snack time. With these simple recipes, you can add a whimsical touch to your treats without breaking the bank or making a mess!
Acorn-shaped Cookies
Baking acorn-shaped cookies is not only a tasty activity but also an excellent way to engage children’s senses and foster their creativity. When it comes to art education, sensory exploration plays a vital role in helping kids develop a deeper understanding of the world around them.
To make these adorable cookies, you’ll need all-purpose flour, butter, sugar, eggs, and vanilla extract. To give them an acorn shape, use a cookie cutter or shape them by hand with a small knife. As you bake, consider encouraging your little ones to explore the textures and smells involved in the process. They can help measure ingredients, mix batter, and even smell the aroma of freshly baked cookies.
This sensory experience is just as valuable as the final product itself. By engaging their senses, children will develop their fine motor skills, hand-eye coordination, and critical thinking abilities – all while having fun making something delicious! To take it a step further, consider decorating the cookies with edible markers or glaze to resemble acorn caps. This added layer of creativity will surely delight both kids and adults alike.
Tips and Variations for Advanced Art Projects
As you become more confident in your acorn art skills, it’s time to experiment with new techniques and ideas, elevating your creations to a whole new level. Let’s dive into some expert tips and creative variations to inspire your next masterpiece!
Using Acorns as Mosaic Pieces
Using natural materials like acorns can add an extra layer of depth and meaning to mixed-media art projects. In this technique, we’ll explore how to use acorns as mosaic pieces, perfect for kids who love nature and want to create something truly unique.
To get started, gather a variety of acorns in different shapes, sizes, and colors. You can collect them from your backyard or go on a fun scavenger hunt to find the perfect ones. Once you have your acorns, sort them by color and size so they’re easy to arrange. Next, apply a small amount of glue to the back of each acorn and start arranging them onto your art piece like tiles in a mosaic.
The benefits of using natural materials in mixed-media art projects are numerous. Not only do they add an organic feel, but they also promote sustainability and creative thinking. When working with acorns as mosaic pieces, encourage kids to experiment with different patterns and arrangements. For example, they can create a geometric design or depict a nature scene like a forest or mountain range.
By incorporating natural materials into their art-making process, kids develop an appreciation for the environment and its resources. This technique also helps them practice patience and attention to detail as they carefully arrange each acorn in place. With this technique, the possibilities are endless, and the final result is sure to be a stunning piece of mixed-media art that showcases the beauty of nature.
Combining Acorns with Other Materials
When working on advanced acorn art projects with kids, it’s time to think outside the box and combine these natural wonders with other materials to create truly unique pieces. One great way to do this is by incorporating paper into the mix.
Try gluing acorns onto a piece of construction paper to create a collage or mosaic artwork. You can also use paint or markers to add colors and patterns to the acorns before attaching them to the paper. This adds texture, visual interest, and depth to the final art piece.
Fabric is another versatile material that pairs well with acorns. Use a glue stick or decoupage medium to attach individual acorns to a piece of fabric, creating a beautiful embroidery-like effect. You can also use fabric scraps to create intricate designs and patterns around the acorns.
Don’t forget about recycled items! Consider using old book pages, music sheets, or cardboard to create three-dimensional art pieces with your kids. Glue the acorns onto these materials and add embellishments like glitter or stickers for an extra touch of personality.
Frequently Asked Questions
How do I store acorns for future art projects?
Store acorns in a dry, airtight container to prevent moisture from causing them to mold or rot. You can also consider drying them out completely using a low-temperature oven or a food dehydrator to extend their shelf life.
What if my child is allergic to certain materials used in acorn art projects?
If your child has allergies or sensitivities, opt for hypoallergenic materials like washable markers or edible decorations. Consider substituting acorns with other natural materials, such as pinecones or seed pods, to create alternative art pieces.
Can I use acorns that have fallen on the ground in my backyard?
Yes, you can definitely use acorns from your own yard! However, make sure to clean and disinfect them thoroughly before using them for art projects. This will help prevent any potential contamination or germs from entering your workspace.
How do I involve children with different skill levels in acorn art projects?
Consider breaking down complex projects into smaller, more manageable tasks that cater to each child’s abilities. For example, younger kids can focus on decorating the acorns, while older kids can help create more intricate designs or assemblages.
What if my child wants to use paint, but I’m worried about making a mess?
Use washable paints specifically designed for children, and set up a dedicated art space with paper towels, smocks, and other protective gear. This will minimize the risk of messy cleanups while still allowing your child to express their creativity with paint.