
Halloween is just around the corner, and you know what that means – costumes, decorations, and spooky fun! As a kid, there’s nothing quite like getting into character for Halloween, but let’s be honest, sometimes it can be tricky to come up with creative costume ideas. One often-overlooked yet super-easy way to add some spook-tacular flair to your little one’s Halloween look is by crafting some spooky hands! With just a few simple supplies and some creativity, you can create the most realistic (and unsettling) fingers and hands that will make their friends scream with delight. In this guide, we’ll walk you through our step-by-step process for creating spooky hands for kids, complete with fun designs and essential safety tips to ensure your little one’s fingers stay safe and healthy throughout the Halloween season.
Introduction to Hands for Halloween
Let’s get creative and dive into some spook-tacular hand craft ideas perfect for kids to make their own unique Halloween accessories.
What’s Trending in Hands for Halloween?
This year’s Halloween season is all about creativity and self-expression, and hands are no exception. For kids, designing their own unique hand art has become a highly anticipated part of the holiday celebration. Among the most popular hand designs for kids are superheroes’ logos, cartoon characters, and mythical creatures like unicorns and dragons.
You can also find various DIY tutorials online that cater to different age groups and skill levels. Some ideas include using fabric paint or markers to create colorful patterns, adding glitter accents for extra sparkle, or even incorporating small objects like beads or sequins into the design. Consider letting your child’s imagination run wild with a ‘hand-painted masterpiece’ theme.
For younger kids, simpler designs like handprints with fun phrases or characters can be just as effective and adorable. Some parents opt for more elaborate designs featuring their child’s name, favorite animal, or beloved book character. Whatever the design, it’s essential to encourage your child’s creativity and let them take ownership of their unique hand art.
Importance of Getting Involved in Halloween Crafts
Getting involved in Halloween crafts is an excellent way to tap into your child’s creativity and fine motor skills. Hands are a great project for kids because they allow them to be as creative as they want while still learning new skills.
For one, hands projects foster fine motor skills, which are essential for young children. As they cut, glue, and assemble their hand crafts, they develop dexterity and coordination in their fingers and hands. This skill will serve them well in the long run as they grow into adults who can perform tasks such as tying shoelaces, buttoning shirts, and even playing musical instruments.
Moreover, making hand crafts encourages creativity and self-expression. Children love to decorate their hands with bright colors, glitter, and other embellishments, which allows them to express themselves freely. You’ll be amazed at how different each hand craft turns out, reflecting the unique personality of your child. To encourage this creativity, provide a variety of materials for them to choose from, such as stickers, stamps, and markers.
As you engage with your child in making Halloween hand crafts, don’t forget to have fun yourself! This experience is an excellent opportunity for bonding and creating lifelong memories.
Design Ideas for Hands for Halloween
Get creative and inspire little monsters with these spook-tacular design ideas that will transform any hand into a one-of-a-kind Halloween masterpiece. From creepy crawlies to spooky spirits, we’ve got you covered!
Classic Monsters: Frankenstein, Dracula, and More
If you’re looking to create some spook-tacular hand crafts for Halloween, why not draw inspiration from classic monsters? Frankenstein’s monster, Dracula, and the Wolfman are iconic creatures that have been frightening kids (and adults) for generations.
You can easily adapt these designs into hand crafts by using fabric, felt, or even paper mache. For example, create a Frankenstein’s hand with a bolted neck plate made from cardboard or foam, attached to a green-stuffed glove. Add some fake stitches and a toothy grin to complete the look.
Dracula’s hand can be created using black fabric or felt, with a long fingernail and a fake fang added for an eerie touch. The Wolfman’s hand can be made from gray fabric or fur, with claws attached to give it a more realistic appearance.
Remember, the key is to keep it simple and have fun! Use items you already have at home, such as paint, glue, and scissors, to bring these classic monsters to life in your hands. You can also get creative by adding details like veins or hair to make them even more convincing.
Superheroes and Villains: Hand Designs Inspired by Comic Books
If you’re looking for a creative way to make your Halloween hand decorations stand out, why not draw inspiration from the world of comic books? Popular superheroes and villains have iconic logos and symbols that can be transformed into unique hand designs. For example, create a Superman logo on your palm using paint or markers, complete with red and blue stripes. You could also use stickers to replicate the Bat-Signal from Batman’s logo.
For a more elaborate design, try making a Spider-Man web pattern on your fingers using white glue and glitter. Or, if you’re feeling adventurous, create a villainous look by painting a Joker-style playing card suit design on your hand. Don’t forget about other beloved characters like Wonder Woman, Iron Man, or the X-Men – their logos and symbols can be reimagined as fun and easy-to-create hand decorations.
Remember to get creative with materials you have at home, like paint, markers, glue, and glitter, to add a personal touch to your superhero-inspired hands. With a little imagination, you can turn yourself into a comic book hero (or villain) in no time!
Materials and Preparation for Hands for Halloween
Now that you’ve chosen your spooky hand design, let’s get started on gathering everything you need to make it a reality. This is where things get fun – preparing your materials!
Choosing the Right Paints and Supplies
When it comes to choosing paints and supplies for your kid’s Halloween hand project, you want to ensure that they’re using materials that are not only fun but also safe. Acrylic paints are a great option as they’re water-soluble, easy to clean up, and dry quickly, making them perfect for kids who can’t wait to get creative.
Tempera paints are another popular choice for kid’s projects, offering vibrant colors and a smooth finish. However, be aware that tempera paints take longer to dry than acrylics and may require additional coats to achieve the desired effect.
Consider investing in washable markers or colored pencils as well, which can add a fun twist to your project without making a mess.
When selecting supplies, make sure to choose kid-friendly materials that won’t cause allergic reactions or skin irritation. Some great options include sponges, brushes, and foam stamps. These tools allow kids to get creative while minimizing the risk of accidents.
By choosing the right paints and supplies for your kid’s hand project, you’ll not only be ensuring their safety but also fostering a sense of creativity and self-expression that will last long after Halloween is over.
Preparing the Hands: Tips and Tricks
Before you start decorating those little hands, it’s essential to prepare them properly. Cleaning and drying are crucial steps that’ll help your decorations adhere better and last longer. Start by washing the child’s hands with soap and water to remove dirt and oils. This will ensure a clean surface for painting or attaching decorations.
Next, dry their hands thoroughly, paying extra attention to the creases between the fingers. You can use a towel or let them air-dry completely. For an added layer of dryness, try using a baby powder or cornstarch on the palms and fingertips. This will help absorb excess moisture and prevent smudging.
When it comes to drying, you can also try using a hair dryer on a low setting or letting the child wash their hands under warm running water before blotting them dry with a towel. The key is to make sure their skin isn’t too damp or too dry – just right for painting or gluing decorations in place.
Step-by-Step Instructions for Painting Hands for Halloween
Now that you’ve got your spooky hand designs, let’s get painting! Follow these simple steps to create realistic-looking hands for a howling good time this Halloween.
Creating a Base Coat: How to Prepare the Hand
Before you can start painting on the fun designs and colors, you need to prepare the hand for painting. This is where the base coat comes in – a special layer that helps the paint adhere evenly and prevents it from flaking off too quickly.
To apply a base coat, you’ll need a small amount of liquid latex or a specialized hand painting liquid. You can find these products at most craft stores or online. Dip your brush into the liquid and apply a thin, even layer to the back of the hand, making sure to cover all areas completely. If using liquid latex, it’s essential to work in a well-ventilated area and follow the manufacturer’s instructions.
Once you’ve applied the base coat, allow it to dry completely before moving on to the next step. This might take anywhere from 10 to 30 minutes, depending on how thickly you applied the layer. To speed up the process, try using a hair dryer on a low setting or allowing the hand to air dry in a warm environment.
When the base coat is dry, your hand is now ready for painting!
Adding Details and Patterns: Tips for Kids
Now that you’ve got the basic hand painting down, it’s time to add some personality with patterns and textures! This is where things can get really fun. You don’t have to be a pro artist to create awesome details – just think about what makes your costume special.
Start by thinking about the color scheme of your costume. Do you want to stick to traditional Halloween colors like orange, black, and purple? Or do you want to mix it up with some brights or metallics? Choose a few colors that you love and get ready to add some patterns!
Use stencils or stickers for simple designs like polka dots, stripes, or chevrons. You can also use tape to create fun shapes or borders. For more intricate designs, try using a small brush to paint on details like fingernails, veins, or even tiny monsters.
Another great way to add texture is with fabric paint or markers. These come in all sorts of colors and are easy to apply – just make sure to follow the instructions on the packaging! You can also use makeup or face paint to create fun textures like glitter or shimmer. Just remember to wash it off when you’re done!
Remember, the most important thing is to have fun and be creative! Don’t be afraid to experiment with different techniques and see what works best for your costume.
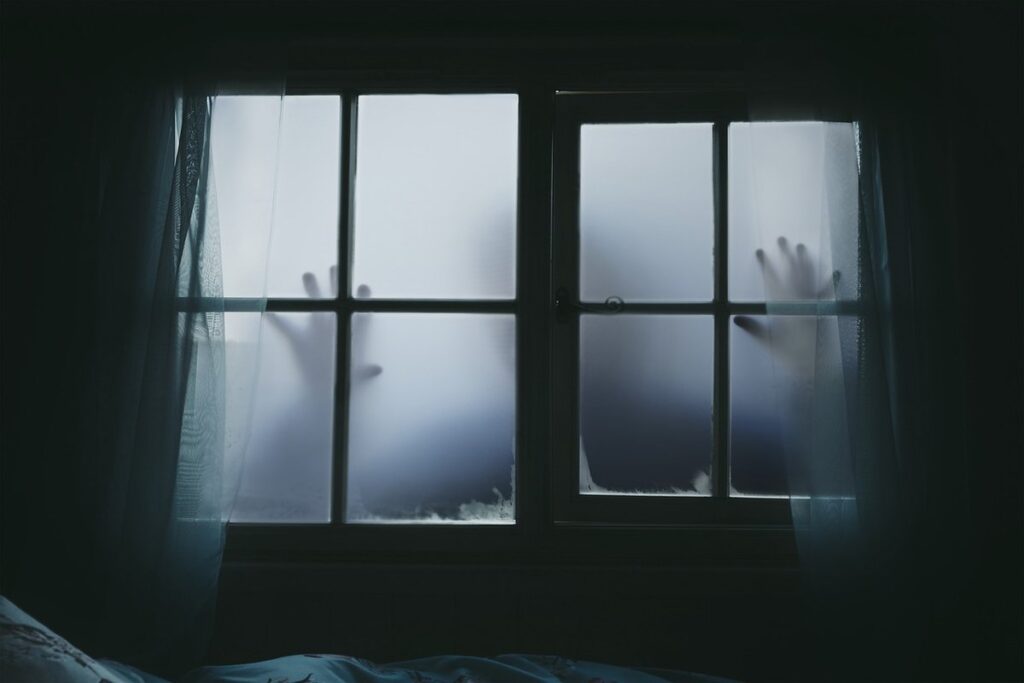
Displaying Your Masterpieces: Tips and Tricks for Kids
Now that you’ve made those spook-tacular hands, let’s talk about how to proudly display your masterpieces in a way that will make everyone scream with delight!
Displaying Hands: Ideas and Inspiration
Now that you’ve created some amazing hand crafts for Halloween, it’s time to showcase them proudly. You want to display these masterpieces in a way that adds to the festive atmosphere and makes everyone smile. Here are some creative ideas to get you started.
Displaying hands in a window is a fantastic way to create a spooky yet fun ambiance. Use some twinkling lights or a string of fairy lights behind your hand crafts to add a magical glow. You can also use some cardboard cutouts or foam board to create a spooky background that complements the theme. For example, if you have made hand prints in black paint, you can use a large piece of orange cardstock as the background to resemble a pumpkin.
If you’re looking for something more elaborate, consider creating a gallery using frames and strings to hang your hand crafts on a wall or across a room. You can even set up a mini Halloween-themed village with cardboard boxes, rocks, and other recycled materials. This way, kids can see all their creations in one place and feel proud of their artistic skills.
Taking Photos of Your Creations
Taking great photos of your Halloween hand creations is just as much fun as making them! When it’s time to share your masterpieces with family and friends, a clear and well-lit photo can really make the difference. To capture your little monster’s best hand, here are some tips to get you started.
First, choose a plain background that won’t distract from the stars of the show – your child’s hands! A colorful tablecloth or even a black cardboard box can work wonders. Next, ensure good lighting by placing your camera near a natural light source, such as a window. Avoid direct sunlight, which can create harsh shadows.
Experiment with different angles and poses to add some creativity to your photos. You could try holding the hand up high to emphasize the decorations or capture a close-up shot of the details. And don’t forget to have fun! Encourage your child to make funny faces or gestures to add some personality to the photo.
Some other tips include using a tripod for steadier shots, experimenting with different camera settings (like flash or timer), and getting down low to capture a more interesting perspective. By following these simple steps, you’ll be well on your way to capturing fantastic photos of your little one’s hand creations.
Safety Precautions for Painting Hands for Halloween
Before you start painting those spooky hands, make sure to follow these essential safety precautions to avoid any accidents. We’ll guide you through what to do and what not to do!
Health Considerations: Choosing Safe Materials
When it comes to painting hands for Halloween, safety should always be top of mind. Choosing non-toxic materials is crucial to ensure that our little ones stay healthy and happy throughout the holiday season.
Before you start shopping for paint, take a closer look at the ingredient labels. Opt for water-based or tempera paints specifically designed for use on skin, as they are much safer than traditional craft paints. These types of paints are usually labeled as “non-toxic” or “hypoallergenic,” and they’re less likely to cause allergic reactions.
To further minimize risks, always follow basic health guidelines when painting hands. Make sure the area is well-ventilated, and wash those tiny hands thoroughly with soap and water after the paint has dried. Remove any remaining paint with a gentle cleanser or nail polish remover. It’s also essential to patch test any new paint on a small skin area before applying it to the hands.
Remember, safety shouldn’t compromise creativity. With a little extra attention to detail and the right materials, you can create spooky yet safe hand art for your kids to enjoy.
Allergic Reactions and Skin Irritations
When painting your child’s hands for Halloween, it’s essential to be aware of potential allergic reactions and skin irritations. Some common culprits behind these issues are certain pigments, dyes, or preservatives found in paint. To identify an allergic reaction or skin irritation, look out for redness, itching, swelling, or blistering on the skin.
If you notice any of these symptoms, stop painting immediately and wash your child’s hands thoroughly with soap and water. Remove as much of the paint as possible from their skin using a gentle exfoliating scrub or a cotton ball soaked in nail polish remover (for acrylic-based paints). To prevent further irritation, apply a moisturizer or calamine lotion to soothe and calm the skin.
Some parents have reported that their children experienced allergic reactions to certain brands of Halloween-themed paint. If your child has sensitive skin, consider opting for hypoallergenic or non-toxic paint specifically designed for use on skin. Always read labels carefully and look for certifications from reputable organizations like the FDA or EPA. By taking these precautions, you can minimize the risk of allergic reactions and ensure a fun and safe Halloween experience for your little ones.
Frequently Asked Questions
Can I use this DIY method for making spooky hands with younger kids?
Yes, the step-by-step process can be adapted to suit different age groups. For younger kids, you may need to simplify the design and provide closer supervision during the painting process.
What if my child has sensitive skin? How can I ensure their safety while creating these Halloween hand crafts?
Choose safe materials, such as water-based paints or tempera paint, which are less likely to cause skin irritation. Also, make sure to use a base coat and follow proper hygiene practices when preparing the hands for painting.
Can I reuse last year’s hand designs or do I need to create new ones every year?
While it’s not necessary to create entirely new designs each year, you can certainly mix-and-match elements from previous years’ creations. Consider updating classic monsters or superheroes with fresh colors and patterns to keep things exciting.
How long do these hand crafts typically last, considering the wear and tear of Halloween parties and gatherings?
With proper care and handling, your hand crafts can withstand the test of time for several weeks. To extend their lifespan, consider using a sealant or clear coat over the paint, which will help protect against fading and damage.
Can I use these DIY methods to create hands for other holidays beyond Halloween?
While this guide specifically focuses on Halloween-themed hand crafts, you can adapt the techniques and materials used here to create unique designs for other celebrations. For instance, use similar methods to create patriotic or festive-themed hands for 4th of July or Christmas events.