
Are you ready to hop into some fun and creative Easter activities with your little ones? As a parent or caregiver, you know how special this time of year can be for kids. The Easter season is all about new life, renewal, and celebrating with loved ones – making it the perfect opportunity to foster creativity, imagination, and family bonding experiences. But let’s face it: finding fun and engaging activities that won’t break the bank or leave you stressed can be a challenge. That’s where this collection of Easter crafts for kids comes in! From adorable paper plate bunnies to egg decorating ideas, we’ve curated a list of DIY projects perfect for homeschooling or simply adding some festive flair to your family gatherings.
Introduction to Easter Crafts
Welcome to our Easter crafts for kids guide, where we’ll get creative and make some fun, easy-to-make decorations for the holiday. Let’s start by making something special together!
What is the Importance of Easter Crafts for Kids?
Engaging kids in Easter crafts is not just a fun activity, but it also offers numerous benefits that can last a lifetime. One of the most significant advantages of Easter crafts for kids is the development of fine motor skills. Activities like coloring eggs, making paper plate bunnies, or assembling Easter-themed puzzles help children refine their hand-eye coordination and dexterity.
Moreover, Easter crafts are an excellent way to foster creativity in kids. With a little guidance and encouragement, they can express themselves through various art forms, such as painting, drawing, or even creating their own Easter cards. This freedom of expression not only boosts confidence but also develops problem-solving skills and critical thinking.
Another significant benefit of Easter crafts is the creation of family bonding experiences. Gathering around the table to make Easter-themed crafts together can be a wonderful way to spend quality time with your loved ones, strengthening relationships and creating cherished memories.
Choosing the Right Materials and Supplies
When it comes to Easter crafts for kids, selecting the right materials and supplies is crucial for a safe and enjoyable experience. Start by considering the age of the child. For younger ones (ages 3-5), opt for soft, easy-to-handle materials like foam shapes, colored paper, and large-tip markers. These will help prevent accidents and frustration.
For older kids (ages 6-12), you can introduce more complex supplies like glitter, sequins, or fabric paint. However, always supervise their use to avoid any potential messes. It’s also essential to choose materials that are washable and non-toxic, such as watercolor paints or fabric markers.
Some other tips for selecting the right materials include:
• Checking the child’s skill level and interests
• Choosing supplies that align with the craft project’s theme
• Considering any allergies or sensitivities
• Having a variety of materials on hand to accommodate different learning styles
By taking these factors into account, you can create an Easter crafting experience that’s both fun and educational for kids.
Spring-themed Crafts Perfect for Easter
Get ready to hop into some fun and creative ideas as we explore spring-themed crafts perfect for decorating your home and celebrating Easter with kids. From bunny masks to flower crowns, we’ve got you covered!
Paper Plate Bunny Craft
Get ready to hop into Easter fun with our adorable paper plate bunny craft! This easy and eco-friendly project is perfect for kids of all ages. To create these cute critters, start by cutting out the ears and tail from construction paper or cardstock. Help your little ones glue them onto a paper plate, which will serve as the bunny’s body.
Next, use crayons, markers, or paint to decorate the bunny’s fur. For younger kids, try using large, bold strokes for a fun, textured look. Older kids can experiment with different patterns and colors. Add some cotton balls or pom-poms for whiskers, and don’t forget those cute little eyes! Use googly eyes or draw them on with markers to bring your bunny to life.
For an added twist, try using different colored paper plates or adding embellishments like glitter, stickers, or sequins. This craft is a great way to encourage creativity while teaching kids about recycling and repurposing materials. With just a few simple steps, you’ll have a herd of adorable paper plate bunnies hopping their way into Easter joy!
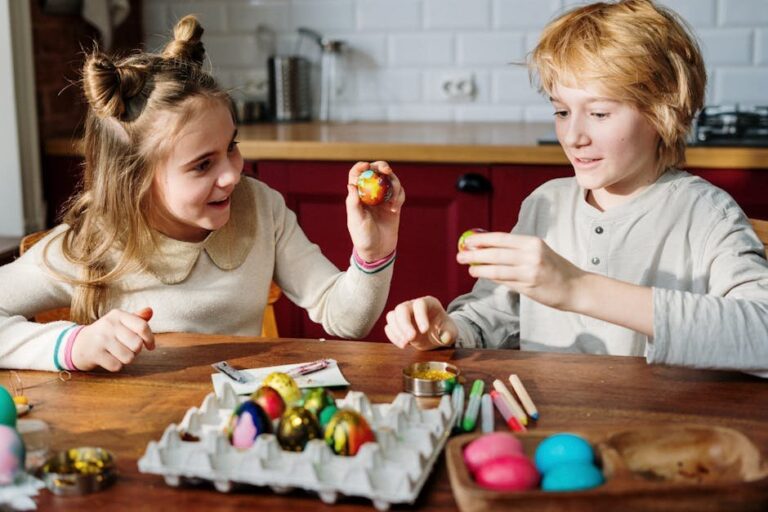
Easter Egg Decorating Ideas
When it comes to decorating Easter eggs, the possibilities are endless. To cater to different skill levels and age groups, we’ve got a range of methods to share with you.
For younger kids, dyeing eggs is a classic and easy way to get creative. You can use store-bought egg dyes or create your own natural colors using beets, turmeric, and blueberries. Simply boil the eggs, let them cool, then submerge them in the dye mixture for a fun and colorful result.
For older kids who want to try something more advanced, painting is a great option. Use acrylic or watercolor paints to add intricate designs and patterns to your eggs. You can also use stencils or stickers to help with precision.
Another technique worth trying is decoupage. Cut out images from paper or magazines and apply them to the egg using a sealant like varnish or Mod Podge. This method adds a beautiful, layered look that’s perfect for kids who love art and design.
Remember to always supervise children when working with materials like paint and dye, and encourage them to experiment with different techniques to find what works best for them. With these methods, you’ll be well on your way to creating beautifully decorated Easter eggs that will impress family and friends alike!
Paper Flower Wreaths
Creating a beautiful paper flower wreath is a fun and creative activity that kids can enjoy. Not only are they stunning decorations for Easter, but they also make lovely gifts for family members or friends.
To get started, you’ll need some colored cardstock, scissors, glue, and a wire coat hanger to form the base of your wreath. You can use any color combination that fits your Easter theme, but classic pastels like pink, yellow, and blue are always a hit. To create realistic petals, try layering small pieces of tissue paper or crepe paper in soft shades.
For leaves, you can use green cardstock or even real leaves if you have access to them. Cut out teardrop shapes for the large leaves and smaller ovals for the smaller ones. Arrange your flowers and leaves on a flat surface before attaching them to the wire base using glue or floral tape.
Tips: Experiment with different petal layers and leaf arrangements to achieve a natural look, and consider adding some embellishments like glitter or ribbons to give it an extra festive touch. This activity is perfect for kids aged 8-12 who can follow simple instructions and enjoy some creative freedom.
Creative Easter Egg Hunt Ideas
Get ready to shake things up and make this Easter egg hunt one your little ones will never forget, with these unique and creative ideas! We’ll share fun ways to hide eggs around the house.
Setting Up a Scavenger Hunt
Setting up an Easter egg hunt can be just as fun as participating in one. To make it more engaging for kids, you’ll want to incorporate some creative strategies into the planning process.
One approach is to hide eggs in plain sight, making them easily visible but still challenging to reach. This can be done by placing them on high shelves, behind furniture, or even under cushions. Alternatively, use clues and riddles to lead the hunters on a treasure hunt-like adventure. For example, you could write a poem with cryptic hints about the egg’s location or create a series of rhyming riddles that guide the kids through the house.
Another idea is to incorporate themed elements into the hunt, such as hiding eggs based on their color (e.g., blue for boys and pink for girls) or giving clues related to Easter-themed movies or books. To take it up a notch, consider setting up an “egg-stravagant” scavenger hunt with multiple locations throughout the house or yard, each with its own set of challenges and rewards.
To add an extra layer of excitement, create a system where kids can earn stickers or stamps on a chart for each egg they find. This not only keeps track of their progress but also provides a fun way to display their accomplishments when the hunt is over.
Incorporating Storytelling into the Hunt
Incorporating storytelling into your Easter egg hunt can elevate the experience from mere treasure hunting to an immersive adventure that sparks creativity and imagination in children. This approach not only encourages teamwork but also fosters critical thinking, problem-solving skills, and language development.
Consider linking each hidden egg or clue to a particular character or event from a favorite fairy tale or mythological story. For example, if you’re using the classic tale of Peter Rabbit, hide eggs with riddles related to his adventures in Mr. McGregor’s garden. As children collect these clues, they’ll engage in role-playing and create their own narratives, much like authors do when writing stories.
To make this more engaging, consider the following tips:
* Design a treasure map that leads children through various stations where they must complete tasks or solve riddles before finding the next clue.
* Incorporate visual storytelling elements such as illustrations or cutouts from the story on egg containers or around hiding spots.
* Create scenarios where children have to make choices and decide what actions to take, allowing them to develop decision-making skills.
Using Technology to Enhance the Hunt
Incorporating technology into your Easter egg hunt is an excellent way to make it more engaging and fun for kids. There are numerous digital tools, apps, and games that you can utilize to create a more interactive experience.
For instance, you can use GPS-enabled scavenger hunts to hide eggs around the house or backyard. Kids will love using their smartphones to track down the hidden eggs and see who finds the most. Apps like Geocaching or Scavify offer a range of templates and features that make it easy to set up your own hunt.
Another option is to create an Easter egg hunt game within popular games like Pokémon Go or Minecraft. This will allow kids to participate in the hunt while also using their existing gaming skills. Alternatively, you can design a digital treasure map using a tool like Canva or Adobe Illustrator, leading the kids on a virtual adventure around the house.
Remember to set boundaries and ensure that children are aware of online safety guidelines when using technology during the hunt. With a little creativity, you can turn your Easter egg hunt into a fun and modern experience that kids will cherish for years to come.
DIY Easter Crafts for Homeschooling
If you’re a homeschooling parent, I’ve got some egg-cellent ideas to make your Easter celebration even more special and fun for the kids. Get ready for some creative DIY Easter crafts!
Seasonal Sensory Bin Activities
Creating sensory bins is an excellent way to engage your kids in Easter-themed activities while promoting exploration and discovery. For this activity, you’ll need a large container, spring-themed materials like rice, beans, or sand, and some hidden Easter eggs.
Fill the container about 2/3 full with the chosen material, and then add some small toys, beads, or other objects to create visual interest. Next, bury several small plastic Easter eggs filled with candy or small toys within the material. You can also include a few surprise objects like a small stuffed bunny or a spring-themed figure.
To enhance the experience, consider adding scents like lavender or vanilla to the materials for an extra sensory experience. This is a great way to engage your child’s sense of smell and explore different textures. Encourage your child to dig through the material using their hands or a small tool like a spoon or trowel, searching for the hidden Easter eggs.
As they play, ask open-ended questions like “What do you think will be inside the egg?” or “How does it feel when you touch this material?” This activity encourages problem-solving and critical thinking while fostering creativity and imagination.
Creating an Easter Village
Creating an Easter village is a fun and engaging DIY project that encourages children to think creatively and use their imagination. To get started, gather some basic materials such as cardboard boxes of various sizes, fabric scraps, glue, scissors, paint, and other embellishments like ribbons or buttons.
Begin by cutting out windows and doors on the larger box, which will serve as the main building for your village. Let your child’s creativity shine when decorating the exterior with paint, markers, or stickers. Add some texture to your village by gluing fabric scraps onto the walls or creating a garden area using felt flowers.
Next, cut out smaller boxes to create individual houses and shops, which can be arranged around the main building. Encourage your child to think about what types of businesses they would like to see in their Easter village, such as a bakery or an ice cream shop. As you build and decorate together, talk about the importance of community and how these small shops contribute to the village’s charm.
Remember, this project is all about having fun and exploring your child’s creativity, so don’t be afraid to make mistakes or try new things. With a little imagination and some basic materials, you can create a whimsical Easter village that brings joy to your home for years to come.
Tips for Parents: Making Easter Crafts Fun
As a parent, you want your little ones to have a blast making Easter crafts without the stress of mess and frustration. We’ve got some practical tips to help you make Easter craft time enjoyable for everyone!
Encouraging Imagination and Creativity
As you guide your child through Easter craft activities, it’s essential to remember that imagination and creativity are just as important as fine motor skills and color recognition. To foster these qualities, try incorporating open-ended questions into your crafting sessions. Ask your child what they think the finished product should look like, or how they can make it more interesting. This not only encourages creative thinking but also helps them take ownership of their project.
When working on a craft together, aim to intervene minimally and let your child’s imagination run wild. Resist the temptation to point out “mistakes” or offer precise instructions – this can stifle creativity and lead to frustration. Instead, observe and provide encouragement as they experiment with different materials and techniques. For example, if you’re making a Easter-themed collage, ask your child what colors they think would best represent spring or which shapes they’d like to use.
By embracing a more hands-off approach, you’ll be surprised at the innovative ideas that emerge from your child’s imagination.
Managing Mess and Expectations
When working with kids on Easter crafts, it’s natural to feel overwhelmed by the mess and chaos that can ensue. To minimize waste and ensure a smooth crafting process, start by setting clear expectations from the beginning. Explain to your child what you hope to create together, and show them examples of Easter-themed crafts to inspire their imagination.
To contain the mess, designate a specific craft area in your home where kids can work on their projects without spreading materials throughout the house. Cover surfaces with newspaper or a tablecloth to protect against stains and spills. You can also use washable paints and markers to reduce clean-up time.
Another strategy is to plan ahead by choosing crafts that require minimal waste, such as making Easter-themed cards or decorations using recycled materials like egg cartons and toilet paper rolls. Break down larger projects into smaller, manageable steps to avoid overwhelming your child and reducing frustration. By setting a positive tone from the start, you’ll be able to enjoy the creative process with your child while minimizing mess and stress.
Conclusion: Why Easter Crafts Matter
Now that we’ve explored some creative and fun Easter crafts for kids, let’s talk about what makes these activities truly special. In conclusion, these handmade projects bring so much joy to little ones.
Recap of Key Points
As we wrap up our exploration of Easter crafts for kids, let’s take a moment to reflect on the key takeaways from this article. Engaging your little ones in these creative activities not only brings joy and excitement but also offers numerous benefits that extend beyond the crafting process itself.
By incorporating Easter crafts into your family’s traditions, you can help foster a sense of creativity, fine motor skills, and problem-solving abilities in children. These experiences allow them to express themselves freely, encouraging imagination and self-expression. Additionally, Easter crafts provide an excellent opportunity for intergenerational bonding, as kids can learn from their parents or grandparents while creating memories together.
Some key takeaways to remember include making time for regular crafting sessions, using seasonal materials and themes to spark creativity, and embracing the process over perfection. By adopting these habits and being open to experimentation, you can unlock a world of possibilities with your children and create cherished Easter traditions that will be treasured for years to come.
Final Thoughts and Recommendations
As we conclude our exploration of Easter crafts for kids, it’s essential to reflect on the significance of these activities as a bonding experience between children and parents. Engaging in creative endeavors together can foster a deeper sense of connection and understanding, helping to strengthen relationships and create lasting memories.
Research suggests that when children participate in art-making processes, they develop essential skills such as fine motor control, problem-solving, and critical thinking (1). Moreover, this form of creative expression provides an outlet for emotions, allowing kids to process and cope with the world around them. As a parent, you have the opportunity to be an active participant in your child’s creative journey.
To integrate Easter crafts into your family’s routine, try setting aside dedicated time each week for art-making activities. You can also encourage exploration by providing a variety of materials and supplies, such as paper, paint, glue, and scissors. Don’t worry too much about the end result – focus on the process and enjoy the experience with your child.
Frequently Asked Questions
What if I’m short on time? Can Easter crafts be adapted for a quick activity?
Yes, many of the DIY projects mentioned in this guide can be adapted to fit even the tightest schedules. For example, you can pre-cut shapes and materials for younger children or break down more complex activities into smaller, manageable tasks.
How do I manage mess and expectations with multiple kids participating in Easter crafts?
It’s essential to set clear boundaries and expectations before starting any craft activity. Consider designating a specific crafting area, using washable materials, and encouraging children to take ownership of their creations. This can help minimize mess and make the experience more enjoyable for everyone.
Can I incorporate Easter crafts into our homeschooling curriculum?
Easter crafts are an excellent way to integrate various subjects into your homeschooling schedule. For instance, you can use egg decorating as a math exercise (measuring, counting) or as a language arts activity (writing stories about the Easter season). Be creative and find ways to connect Easter crafts with your child’s learning objectives.
What if my child gets frustrated with their project? How can I encourage them to continue?
When children get stuck or frustrated, it’s essential to offer encouragement and support without giving away the solution. Ask open-ended questions like “What do you think might happen if…”, “How do you think we could solve this problem?”, or “Can you show me what you’ve done so far?” This can help them develop problem-solving skills and think creatively.
How can I make Easter crafts more inclusive for children with special needs?
When adapting Easter crafts for children with special needs, consider their individual abilities and preferences. Use materials that are easy to manipulate (e.g., large-handled crayons) or provide visual aids to facilitate understanding. Encourage participation by breaking down activities into smaller steps and offering assistance when needed.