
As a parent or caregiver, you’re always on the lookout for ways to encourage your child’s cognitive development, creativity, and fine motor skills. One simple yet effective way to do this is through sensory play with sand and slime! These tactile materials can transport kids to a world of imagination and exploration, helping them develop essential skills while having tons of fun. But have you ever wondered how to create a safe and engaging sensory experience for your little ones? From setting up the perfect sandcastle-building station to crafting unique slime recipes, we’ve got you covered! In this article, we’ll share our top tips and activities for creating an unforgettable sensory play experience with sand and slime that will leave your kids begging for more.
Introduction to Sensory Play
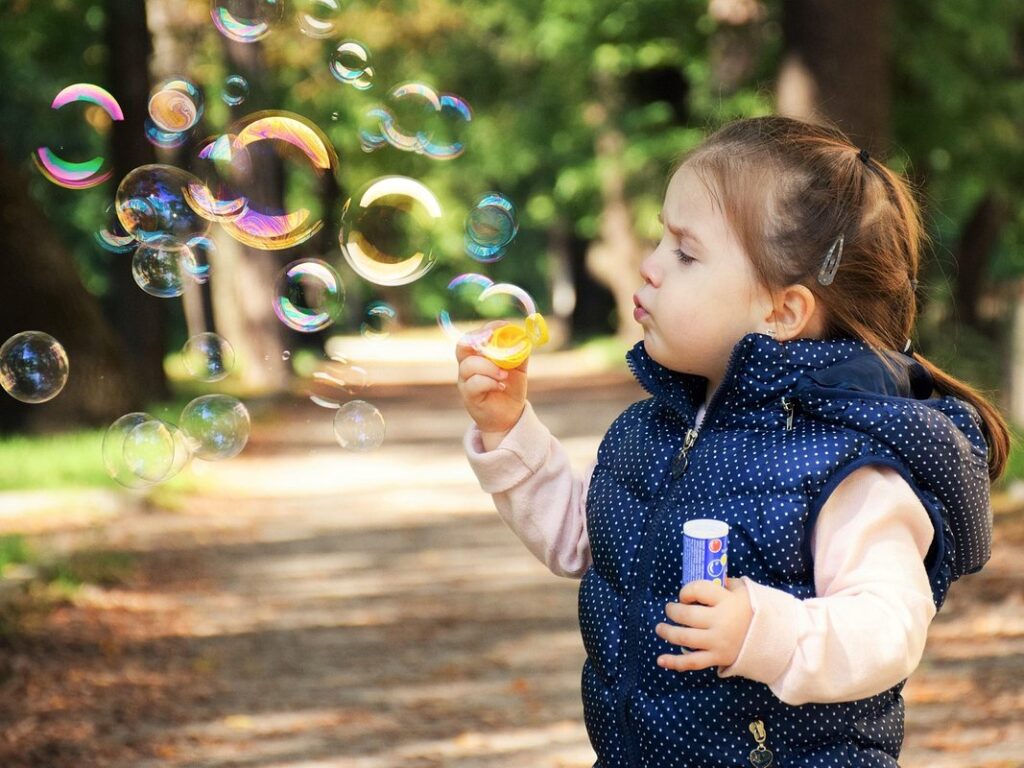
Welcome to the world of sensory play, where kids can explore and learn through hands-on experiences with tactile materials. Let’s start by introducing you to two favorites: sand and slime!
Benefits of Sensory Play for Children
Sensory play is an essential part of childhood development, and its benefits extend far beyond mere entertainment. By engaging their senses with tactile materials like sand and slime, children can experience a wide range of cognitive, motor skill, and creative advantages.
Cognitive development is one area where sensory play shines. Through exploring different textures, temperatures, and consistencies, kids learn to problem-solve, adapt, and think critically. For instance, playing in a sandbox encourages children to predict the behavior of sand, an activity that enhances their understanding of cause-and-effect relationships.
Fine motor skills are also significantly improved through sensory activities like slime-making or digging in sand. As children manipulate materials with their hands, they develop hand-eye coordination, finger dexterity, and overall manipulative ability. This enhanced fine motor control sets the stage for future academic success, as it prepares kids to hold pencils, write, and engage in other intricate tasks.
Creativity is another significant benefit of sensory play. By allowing children to freely experiment with various materials and textures, you’re giving them the space to explore their imagination and express themselves authentically. This creative expression can take many forms, from constructing elaborate sandcastles to inventing novel slime concoctions.
Preparing a Sensory Bin for Sand and Slime
When it comes to preparing a sensory bin for sand and slime, safety is of utmost importance. To create a safe environment for kids, start by choosing a bin that’s large enough to hold the sand and slime mixture without overflowing. A 12-18 inch deep container is ideal, as this will prevent small children from easily reaching in and scooping out handfuls.
Next, consider adding toys or other objects to the bin that are safe for kids to play with, such as plastic figurines, shells, or small rocks. These add an extra layer of engagement and exploration to the sensory experience. When it comes to sand, make sure to select a type that’s fine-grained and gentle on skin. Some popular options include play sand or decorative sand.
Before filling the bin, have fun mixing in some slime! This can be store-bought or homemade, and is a great way to add an extra tactile element to the experience. Consider adding different textures by layering the materials – for example, adding slime on top of sand or vice versa. Remember to supervise your child at all times when engaging with the sensory bin, as they may put non-food items in their mouth.
Types of Sand Suitable for Kids
When it comes to making slime and playing with sand, you’ll want to choose a type that’s safe and fun for your little ones. This section highlights the best types of sand for kids.
Silica Sand: A Popular Choice for Play
Silica sand is often preferred for kids’ play due to its softness and gentle texture. It’s also known as quartz sand, which is a common component of many beaches around the world. One of the benefits of silica sand is that it’s easy on young children’s hands and skin, making it an ideal choice for sensory play.
However, there are some potential health concerns associated with silica sand. When inhaled, silica dust can cause respiratory problems, including silicosis. To minimize this risk, make sure to store the sand in a well-ventilated area and avoid inhaling it while playing. It’s also essential to supervise your child during playtime and encourage them to wash their hands thoroughly afterward.
If you’re concerned about the potential health risks of silica sand, consider using a smaller amount or mixing it with other types of sand for a more diluted effect. You can also create homemade slime using alternative ingredients like cornstarch, flour, and water. This way, your child can still enjoy the sensory experience without compromising their health.
Play Sand vs. Construction Sand: What’s the Difference?
When it comes to creating sand-based activities for kids, understanding the difference between play sand and construction sand is crucial. While both types of sand can be used for crafting and building, they have distinct textures and uses.
Play sand, also known as sandbox sand or children’s sand, is a finely milled sand with a smooth texture that’s gentle on little hands. It’s perfect for sandbox toys, sensory play, and creating elaborate structures. Play sand is usually free of debris and is often washed and cleaned to ensure it’s safe for kids to handle.
On the other hand, construction sand, also known as aggregate or building sand, has a coarser texture and is designed for heavy-duty construction projects. It’s not suitable for children’s play due to its rougher texture and potential presence of rocks or debris. If you’re looking to create a sand-based activity for kids, stick with play sand for the best results.
When shopping for play sand, look for brands that are specifically labeled as “children’s sand” or “sandbox sand.” These products are designed with kid-friendly textures and safety in mind.
Making Slime at Home
Get ready to get slimy! In this section, we’ll show you how to make your own fun and colorful slime using just a few simple ingredients right in your home.
Easy Slime Recipes for Kids
Making slime with kids is an absolute blast, and we’ve got some super easy recipes to share with you. The best part? Most of these require minimal adult supervision, so your little ones can get creative and messy without too much help.
First up, let’s make a classic glue-and-water slime. You’ll need:
* 1 cup of white glue
* 1/2 cup of water
* Food coloring (pick their favorite color!)
* 1 tablespoon of borax
Mix the glue and water in a bowl until it’s smooth, then add some food coloring to make it colorful. Now, have your kid mix 1 tablespoon of borax with 1/2 cup of warm water in another bowl. Slowly add this mixture to the glue mixture, stirring constantly. Keep going until you get the perfect slime!
Another fun recipe is glitter slime! Just add a handful of glitter to your glue-and-water mixture before adding the borax solution. You can also try using different shapes and sizes of beads for added texture.
Remember, always supervise your kids when making slime, especially if they’re young or messy (or both!). And don’t worry if it doesn’t turn out perfectly – that’s half the fun! Encourage your kid to experiment with different recipes and colors until they find their favorite.
Tips for Customizing Your Slime
Now that you’ve made some amazing slime at home, it’s time to take it to the next level! One of the best things about making slime is that you can customize it to your heart’s content. Let’s talk about adding different textures and colors to make your slime truly unique.
Adding textures is a great way to mix things up. Try mixing in some glitter for a sparkly effect, or add some beads for a fun surprise inside the slime. You can also use sand (like we discussed earlier!) for a beachy vibe. Experiment with different materials like sequins, foam shapes, or even cereal pieces to create one-of-a-kind textures.
If you want to change up the color of your slime, there are plenty of options. Use food coloring to add a pop of color, or try using liquid watercolors for a more subtle hue. You can also use colored glue or add some glow-in-the-dark paint for an extra special effect. The possibilities are endless! So don’t be afraid to get creative and experiment with different combinations – it’s all part of the slime-making fun!
Sensory Play Ideas with Sand and Slime
Get ready for some seriously fun sensory play ideas that combine two of our little ones’ favorite textures: sand and slime! We’ve got creative activities to make messy memories.
Beach-themed Sand Activities
Who says you need to be at the beach to have a sandcastle-building extravaganza? With just a little creativity and some imagination, you can bring the beach experience right into your backyard or even indoors! One of the most iconic beach-themed sand activities is building elaborate sandcastles and tunnels. To get started, scoop out a bucket of sand and let your child’s creativity shine.
You can use different shapes and sizes of containers to create various castle designs. For example, you could use a small cup for a tiny turret or a large tub for a majestic castle wall. Don’t forget to add some finishing touches with seashells, rocks, or even food coloring to give it that beachy vibe!
Another fun twist is creating tunnel systems and moats around your sandcastle creations. Use a longer piece of cardboard or a PVC pipe to create tunnels and connect them to the castle. You can also use cups or containers as “water” for the moat. Who knows? Maybe your little one will discover their inner architect!
As you play, don’t forget to get creative with different textures and shapes in the sand. Add some small toys, beads, or even rice to create unique features on your castle walls. And when it’s time to destroy (and rebuild!), have fun stomping down those castles and making a mess – after all, that’s what sensory play is all about!
Indoor Slime Play: Fun Activities for Rainy Days
Rainy days and winter months can be a bummer for kids who love spending time outdoors. But don’t worry, we’ve got some fun indoor slime activities that’ll keep them entertained and engaged on those gloomy days.
First up, let’s talk about the classic slime recipe. With just a few simple ingredients like glue, water, borax, and food coloring, you can create a batch of stretchy, squishy slime that kids will love playing with. To make it even more exciting, try adding some glitter or sequins to give it a sparkly effect.
But why stop at just making slime? You can also set up an indoor slime play station where kids can get creative and messy (and that’s half the fun!). Fill a large bin with shredded paper or foam blocks for kids to knead their slime in, or set up a “slime factory” where they can make their own slime from scratch.
Some other ideas include:
* Making slime-themed art projects using household items like paint, markers, and stamps
* Creating a “slime museum” where kids can display their finished creations
* Playing indoor games like “Slime Tag” or “Pin the Tail on the Slime”
* Watching slime videos or tutorials to inspire new ideas
Remember, the most important thing is to let your child’s imagination run wild and have fun with it! With a little creativity, you can turn any rainy day into an adventure.
Safety Precautions when Playing with Sand and Slime
When playing with sand and slime, it’s crucial to follow some simple safety rules to ensure a fun and safe experience for you and your family. Let’s explore these essential guidelines together!
Allergic Reactions to Sand and Slime Ingredients
When playing with sand and slime, it’s essential to be aware of potential allergens that can cause reactions. Sand itself is generally safe, but some ingredients used to make slime can be problematic for certain children.
Some common allergenic ingredients found in slime recipes include borax, talc, and fragrance oils. Borax, in particular, has been linked to skin irritation, respiratory problems, and even anaphylaxis in rare cases. If your child experiences any of the following symptoms after playing with homemade slime, seek medical attention immediately: redness, itching, swelling, or difficulty breathing.
To minimize the risk of allergic reactions, consider making your own slime using natural ingredients like cornstarch, glue, and water. You can also choose pre-made slime products that are specifically designed to be hypoallergenic. When shopping for sand and slime supplies, read labels carefully and look for certifications like “non-toxic” or “phthalate-free.” By being mindful of potential allergens and taking precautions, you can ensure a safe and fun experience for your child when playing with sand and slime.
Preventing Messes and Creating a Safe Play Environment
When engaging in sensory play with sand and slime, it’s essential to take steps to prevent messes and create a safe play environment. Start by designating a specific area for playtime where kids can get messy without worrying about damaging floors or furniture. Cover the surface with a plastic tablecloth or a waterproof mat to make cleanup easier.
Next, ensure that your child is wearing old clothes or an apron to protect their clothing from stains. You may also want to consider using washable slime or sand specifically designed for indoor play. To prevent messes when playing with slime, try mixing it in small batches and using household items like a plastic container or a cookie sheet to contain the mixture.
Additionally, supervise your child closely during playtime to catch any potential hazards, such as slipping on wet surfaces or inhaling sand particles. Encourage kids to wash their hands thoroughly after playtime and to avoid eating or putting slime in their mouths. By following these simple tips, you can help create a safe and enjoyable play environment for your child to explore and engage with sand and slime.
Conclusion and Final Thoughts
Now that we’ve explored the amazing world of sand and slime, it’s time to wrap up our adventure together and share some final thoughts on what you can do next. Let’s recap!
Encouraging Creative Expression through Sensory Play
As we conclude our exploration of the wonderful world of sand and slime for kids, it’s essential to remember that the true magic lies not just in the materials themselves but in the creative expression they inspire. Sensory play has been shown to have a profound impact on children’s cognitive, emotional, and social development. By engaging your little ones in sensory activities like playing with sand or slime, you’re providing them with a unique opportunity for self-discovery, imagination, and learning.
So, how can you encourage creative expression through sensory play? Start by setting up a dedicated space for experimentation and exploration. Fill a container with different textures of sand, such as colored, glittery, or even water-based varieties. Encourage your child to dig in, mold, and shape the sand into creations that bring them joy. You can also try adding props like shells, rocks, or other natural materials to inspire their imagination.
Remember, the key is to let go of expectations and allow your child’s creativity to shine through. By doing so, you’ll not only be fostering a lifelong love for creative play but also helping your child develop essential skills like problem-solving, critical thinking, and self-expression.
Resources for Further Learning and Fun
If you and your little ones are hooked on sand and slime play, there’s plenty more where that came from. To continue exploring this fun and sensory world, we’ve put together some fantastic resources for further learning and entertainment.
For a deeper dive into the world of sensory play, be sure to check out the amazing books available at your local library or online. “The Magic School Bus Inside the Earth” by Joanna Cole and Bruce Degen is a favorite among kids who love digging and excavating in sand, while “Slime Factory: The Secret Life of Slime” by Sue McGuire introduces young scientists to the fascinating world of polymers.
Online communities are another great way to connect with fellow sensory play enthusiasts. Join the Sensory Play subreddit or Facebook groups like Sensory Play Ideas for Kids, where you’ll find a wealth of creative ideas and inspiration from parents just like you. And for those who love watching slime-making tutorials, YouTube channels like SciShow Kids and Slime Academy offer an endless supply of fun and educational content.
Remember to always supervise your child during sensory play, and encourage them to explore and create with open-ended materials and imagination. Happy playing!
Frequently Asked Questions
Can I mix different types of sand together for a unique sensory experience?
Yes, you can experiment with blending different textures and colors to create a one-of-a-kind sensory bin for kids. Keep in mind that some sands may have varying levels of coarseness or fineness, which could affect the overall play experience. Consider combining fine-grained play sand with larger silica sand particles for a contrasting texture.
How do I prevent my child from inhaling slime ingredients while playing?
No need to worry! Most slime recipes are non-toxic and safe for kids to play with when made correctly. However, it’s essential to supervise your child during slime-making and ensure they understand the importance of not ingesting the slime or its ingredients. Consider using a play mat or surface that can be easily cleaned if accidents occur.
Can I make slime using natural ingredients like cornstarch and water?
Yes! Natural slime recipes are an excellent way to encourage creative expression while minimizing exposure to harsh chemicals. Mix equal parts of cornstarch and water, add a few drops of food coloring (optional), and stir until the mixture thickens into a fun, squishy texture.
How often should I change the sand in my sensory bin?
It’s recommended to change the sand every 1-2 weeks or after 5-7 play sessions, depending on usage. You can also refresh the sand by adding new layers or mixing it with other materials like beads or rice for a fun surprise.
Can kids with sensory sensitivities still participate in sand and slime activities?
While some children may be overwhelmed by certain textures, many can benefit from modified sensory experiences. Consider offering alternative tactile materials or adjusting the intensity of play to accommodate individual needs. Some ideas include using gentle, smooth sands or making a “slime-free” zone for kids who prefer not to engage with slime.